How to Add a Noindex, Nofollow Robots Meta Tag Using Google Tag Manager
Adding a noindex, nofollow robots meta tag to specific pages on your website can help control how search engines crawl and index your content. This is particularly useful for pages like thank-you pages, internal tools, or content you don’t want appearing in search results. Google Tag Manager (GTM) provides a flexible way to implement this without directly editing your website’s code. This article walks you through the process step-by-step.

What is a Noindex, Nofollow Robots Meta Tag?
A robots meta tag instructs search engines on how to handle a webpage. The noindex directive tells search engines not to include the page in their index, while nofollow prevents them from following links on the page. The tag looks like this in HTML:
<meta name="robots" content="noindex, nofollow">
Using GTM, you can dynamically add this tag to specific pages using a custom HTML tag and JavaScript.
Prerequisites
- Access to a Google Tag Manager account and container for your website.
- Basic understanding of GTM’s interface (tags, triggers, and variables).
- Permission to publish changes in GTM.
Step-by-Step Guide
Step 1: Create a Custom HTML Tag
- Log in to Google Tag Manager:
- Open your GTM account and select the container associated with your website.
- Create a New Tag:
- Navigate to Tags in the left sidebar and click New.
- Name your tag something descriptive, like “Noindex Nofollow Robots Meta Tag”.
- Configure the Tag:
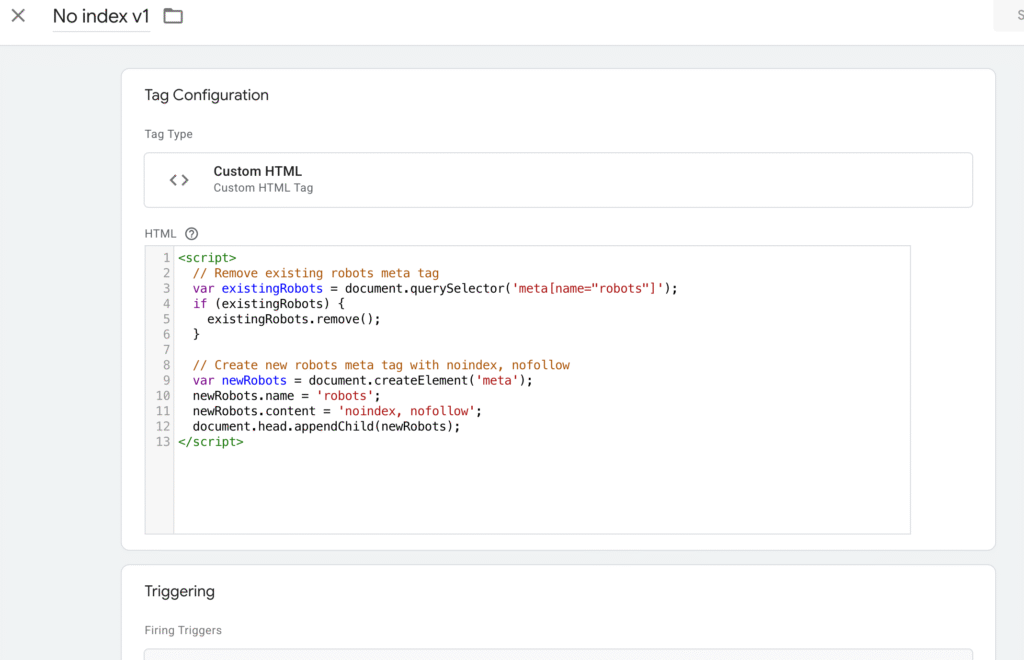
- Click Tag Configuration and select Custom HTML.
- Paste the following JavaScript code into the HTML field:
<script> // Remove existing robots meta tag, if any var existingRobots = document.querySelector('meta[name="robots"]'); if (existingRobots) { existingRobots.remove(); } // Add new robots meta tag with noindex, nofollow var newRobots = document.createElement('meta'); newRobots.name = 'robots'; newRobots.content = 'noindex, nofollow'; document.head.appendChild(newRobots); </script> - This script:
- Checks for an existing robots meta tag and removes it to avoid conflicts.
- Creates a new
<meta name="robots" content="noindex, nofollow">tag and appends it to the<head>section of the page.
Step 2: Set Up a Trigger
- Create a Trigger:
- Click Triggering in the tag configuration and select New (or choose an existing trigger).
- Select Page View as the trigger type, then choose Some Page Views to specify conditions.
- Define the Trigger Condition:
- Set the condition to target the specific page(s) where you want the meta tag applied. For example:
- Page URL > equals >
https://example.com/thank-you-page - Alternatively, use Page Path > contains >
/thank-youfor broader targeting.
- Page URL > equals >
- For multiple pages, use regex or create separate triggers.
- Set the condition to target the specific page(s) where you want the meta tag applied. For example:
- Save the Trigger:
- Name the trigger (e.g., “Noindex Page Trigger”) and save it.
Step 3: Test the Tag
- Enter Preview Mode:
- Click Preview in GTM to enter debug mode.
- Open your website in a new tab and navigate to the page where the tag should fire (e.g., the thank-you page).
- In the GTM preview pane, check if your custom HTML tag appears under “Tags Fired”.
- Verify the Meta Tag:
- Right-click the page, select Inspect, and check the
<head>section for:<meta name="robots" content="noindex, nofollow"> - Ensure any previous robots meta tag (e.g.,
<meta name="robots" content="index, follow">) is removed.
- Right-click the page, select Inspect, and check the
Step 4: Publish the Changes
- Submit the Container:
- Exit preview mode and click Submit in GTM.
- Add a version name and description (e.g., “Added noindex, nofollow meta tag for thank-you page”).
- Click Publish to make the changes live.
- Post-Launch Verification:
- After publishing, revisit the target page and confirm the meta tag is correctly applied using browser developer tools.
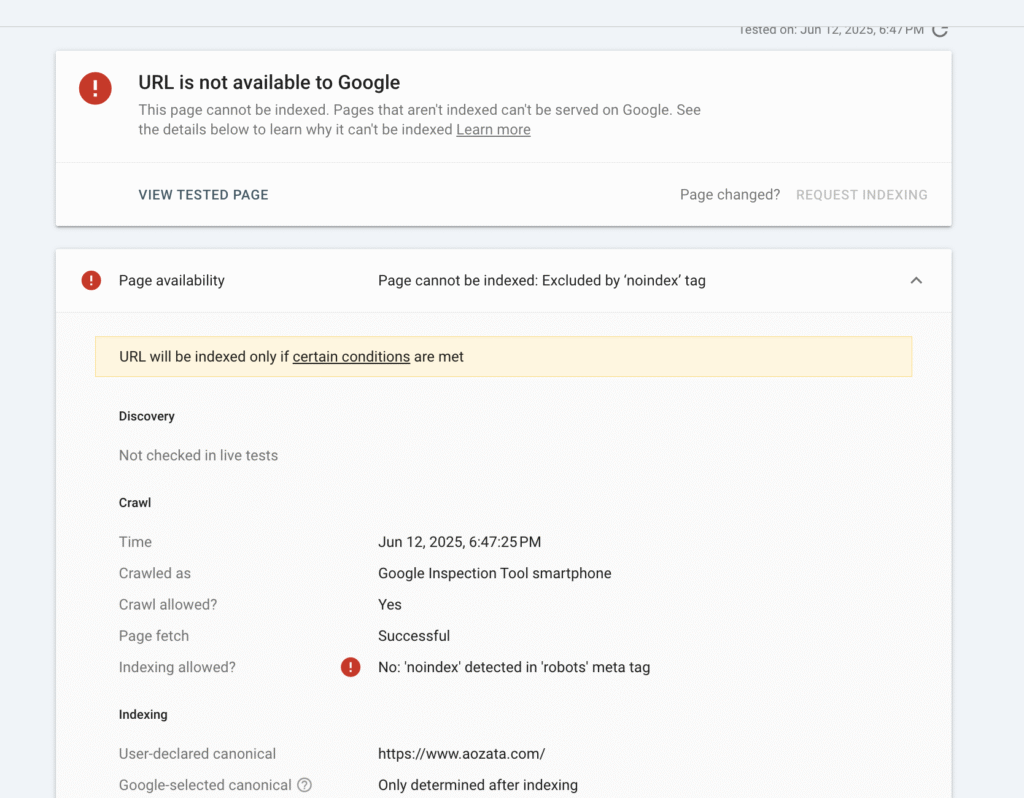
- Optionally, use tools like Google Search Console’s URL Inspection Tool to ensure the page is not indexed.

Best Practices
- Target Specific Pages: Avoid applying
noindex, nofollowto entire sections of your site unless intentional, as it can harm SEO. - Test Thoroughly: Use GTM’s preview mode to ensure the tag fires only on intended pages.
- Document Changes: Keep track of which pages have
noindex, nofollowtags to avoid accidental SEO issues. - Check for Conflicts: If your website already has a robots meta tag, this script will override it. Adjust the script if you need to preserve existing tags.
- Monitor Performance: Regularly review GTM tags to ensure they align with your SEO strategy.
Troubleshooting
- Tag Not Firing:
- The trigger condition is correct (e.g., check for typos in the Page URL).
- GTM’s container snippet is correctly installed on the page.
- Meta Tag Not Appearing:
- Ensure the script runs after the DOM is loaded (the provided script is designed to handle this).
- Check for JavaScript errors in the browser console.
- SEO Concerns:
- If pages are already indexed,
noindexmay take time to take effect. Use Google Search Console to request removal.
- If pages are already indexed,

